
Quick conclusion: Yes, you can remove NotebookLM watermark from exported images. The fastest path is to upload the original export, use AI Smart lower-right corner repair, preview the cleaned corner, and download the result. If you want to do it now, open Remove NotebookLM Watermark.
If you searched for how to remove NotebookLM watermark, the answer is simple: use the online NotebookLM watermark remover first, then read the details if you want to understand why this workflow is safer than cropping.
This is the practical answer to how to remove NotebookLM watermark online: do the cleanup first, then use the explanation below to check whether the cleaned export is good enough for your real use case.
Answer Box
To remove NotebookLM watermark, upload the original NotebookLM export to the online remover, run AI Smart lower-right corner cleanup, preview the repaired corner, and download the clean image. This removes the visible watermark area while keeping the original canvas size.
A NotebookLM watermark remover is a browser-based image cleanup workflow for the visible lower-right mark that can appear on NotebookLM exports. It is best used when the image is your own export and you need a clean slide, document, blog image, or research visual without changing the layout.
The direct workflow is:
- Open the NotebookLM Watermark Remover
- Upload your original NotebookLM export
- Run AI Smart cleanup on the lower-right watermark area
- Check the repaired corner for labels, chart lines, and color mismatch
- Download the clean image
The rest of this guide explains the reasoning behind that workflow: why NotebookLM exports need canvas-preserving repair, when crop is risky, how to use this website, and how to judge whether the final image is good enough for slides, documents, blog images, or social visuals.
Short Answer
You do not need a desktop editor to remove NotebookLM watermark from most exports. Use the browser tool, repair the visible lower-right mark, and keep the original image dimensions. This solves the most common problem: the watermark is gone, but the slide, chart, or document-style visual still keeps its original layout.
Use the button below if you only need the result. Keep reading if you want the explanation, the website tutorial, and the quality checks. The goal of this guide is to show how to remove NotebookLM watermark without turning a small corner cleanup into a full image-editing task.
Remove NotebookLM Watermark Now
The compact query explainer is handled on a separate NotebookLM search-intent page. This page is the practical guide for users who want the result first and the reasoning after that.
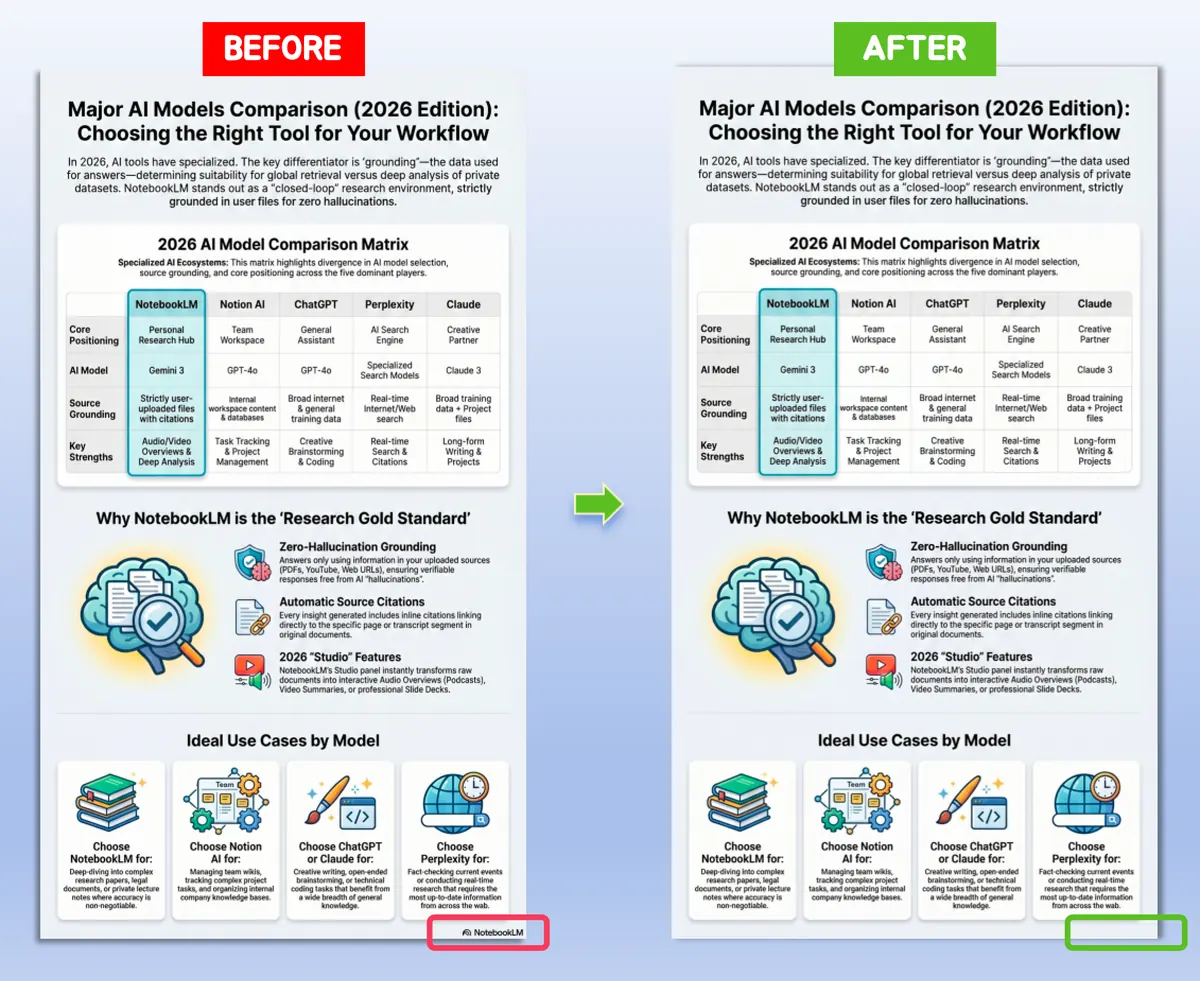
Figure 1: Before-and-after view of a NotebookLM watermark cleanup workflow
Why NotebookLM Images Have a Watermark
NotebookLM exports can include a visible lower-right watermark, which is why the cleanup problem tends to look the same from one export to the next: a small branded mark sitting in the corner you would otherwise reuse.
The difference is the type of image. A NotebookLM export is often not a casual photo. It may be a research summary, a comparison matrix, a source map, a workflow diagram, or an infographic-style visual. Those formats make canvas size and edge detail more important than they would be on a simple background image.
For users, this creates three common problems:
- The mark distracts from slides, docs, and screenshots
- The lower-right corner cannot be reused cleanly in layouts
- Generic blur tools leave smudges or uneven color blocks
The good news is that it is usually straightforward to remove NotebookLM watermark from an export, because the mark often appears in a predictable corner location. The important part is choosing a repair workflow that keeps the image shape and gives you a preview before you use the file.
Open NotebookLM Watermark Remover →
How NotebookLM Watermark Removal Differs From Gemini Cleanup
NotebookLM and Gemini watermark cleanup are related, but they are not the same SEO or product problem.
Gemini image exports are often illustrative images where a quick crop can be acceptable if the lower-right corner is not important. NotebookLM exports are more likely to be structured visuals: comparison tables, research diagrams, source summaries, slide-style explainers, and workflow graphics. In those files, the corner can contain layout boundaries, labels, captions, or alignment space that matters.
That changes the best removal strategy:
| Image source | Common content type | Safer default |
|---|---|---|
| Gemini image export | Illustration, scene, graphic, background image | Quick Crop or AI Smart depending on the corner |
| NotebookLM export | Research visual, slide, chart, summary, diagram | AI Smart corner repair |
| Screenshot of NotebookLM content | Compressed document or browser capture | Use the cleanest source file first |
This is why a guide on how to remove NotebookLM watermark should spend more time on source quality, canvas preservation, and review criteria than a generic watermark-removal article.
Should You Remove, Crop, or Leave the NotebookLM Watermark?
Before you upload the image, choose the right outcome. Removing the visible mark is useful when the image is your own export and you need a clean layout. Cropping is useful only when the corner is disposable. Leaving the mark can be the better decision when provenance, disclosure, or attribution is required.
Use this decision rule:
- Use AI Smart repair when the image must keep its original width and height.
- Use crop only when the lower-right edge has no useful content and aspect ratio does not matter.
- Leave the mark when your use case requires visible attribution or a policy-compliant disclosure.
- Do not use blur as the main method on charts or text-heavy visuals.
For most NotebookLM images, AI Smart repair is the practical middle path. It removes the visible distraction while preserving the structure that makes the export useful.
When To Use This NotebookLM Watermark Remover
Use this workflow when:
- You want to remove NotebookLM watermark from your own exported image.
- The watermark is a visible lower-right mark.
- The original image size matters for a slide, report, blog layout, or thumbnail.
- You can review the repaired corner before publishing or sharing.
Do not use this workflow as a promise to remove hidden provenance, metadata, or required disclosures. It is designed for visible image cleanup, not policy bypassing.
Before You Remove NotebookLM Watermark: Check the Source Image
Before you remove NotebookLM watermark from an image, spend a few seconds checking the source file. This prevents most failed repairs and helps you decide whether the image is safe for automatic corner repair.
Use the original export when possible
Start from the original NotebookLM image instead of a compressed screenshot. Re-saved screenshots usually contain compression blocks, softened text, and color noise. Those artifacts make the lower-right repair harder to blend naturally.
Look at the lower-right corner
Zoom in on the corner where the visible mark appears. Decide whether the mark sits on:
- Plain background or margin space
- A gradient or soft texture
- A chart boundary or table edge
- Small labels, legends, citations, or source text
- Fine diagram lines or icons
Plain corners are usually easy. Corners with labels or diagram lines need a closer review after cleanup.
Confirm whether canvas size matters
For NotebookLM images, canvas size often matters. If the export will go into a slide, report, blog image, thumbnail, or fixed layout, avoid crop-based cleanup. A small crop can shift alignment or make the visual no longer match the surrounding design.
Step-by-Step: How to Remove NotebookLM Watermark
This section covers the website workflow. It is intentionally practical: upload the image, run the correct cleanup mode, review the repaired corner, and download only when the preview passes the checks. If you only remember one thing about how to remove NotebookLM watermark, remember this: preserve the canvas and repair the marked corner.
Step 1: Upload the exported NotebookLM image
Start with the original export if possible. Higher-resolution files give the repair workflow more surrounding texture to work with and produce cleaner results when you remove NotebookLM watermark from the lower-right corner.
For the cleanest result, do not start from a re-cropped copy. The easiest way to remove NotebookLM watermark online is to upload the original visual that still has the full lower-right edge.
Use PNG, JPG, JPEG, or WebP. If you have multiple versions of the same image, choose the least-compressed file. Avoid screenshots of screenshots unless that is the only copy available.
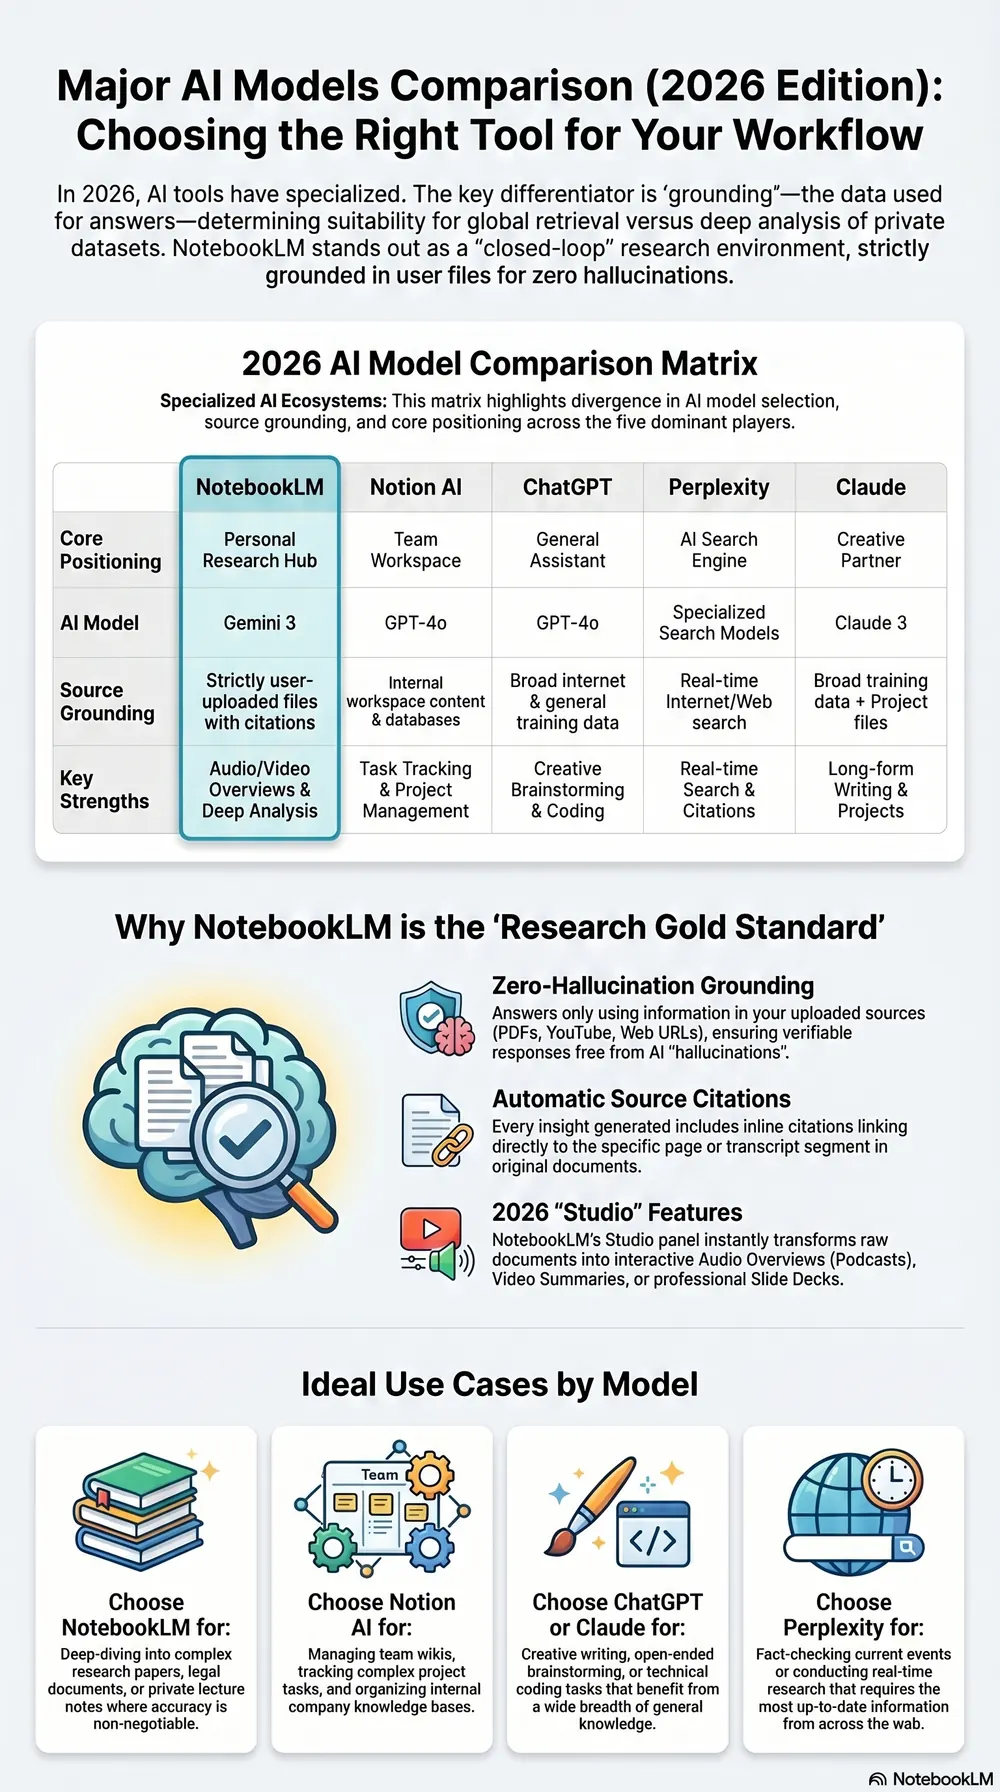
Figure 2: Uploading a NotebookLM image before processing
Step 2: Run AI Smart cleanup
The NotebookLM workflow uses AI Smart cleanup only. Instead of trimming the canvas, it reconstructs the lower-right watermark area so the original image dimensions stay intact.
This is the key difference from a general crop workflow. NotebookLM visuals often contain structured information, so preserving width and height is usually more useful than cutting away the marked edge. If your goal is to remove NotebookLM watermark for a deck or report, keeping the layout unchanged is usually the safer choice.
That is also why this workflow answers how to remove NotebookLM watermark better than a generic blur tool: it focuses on the visible corner mark without flattening nearby chart lines or labels.
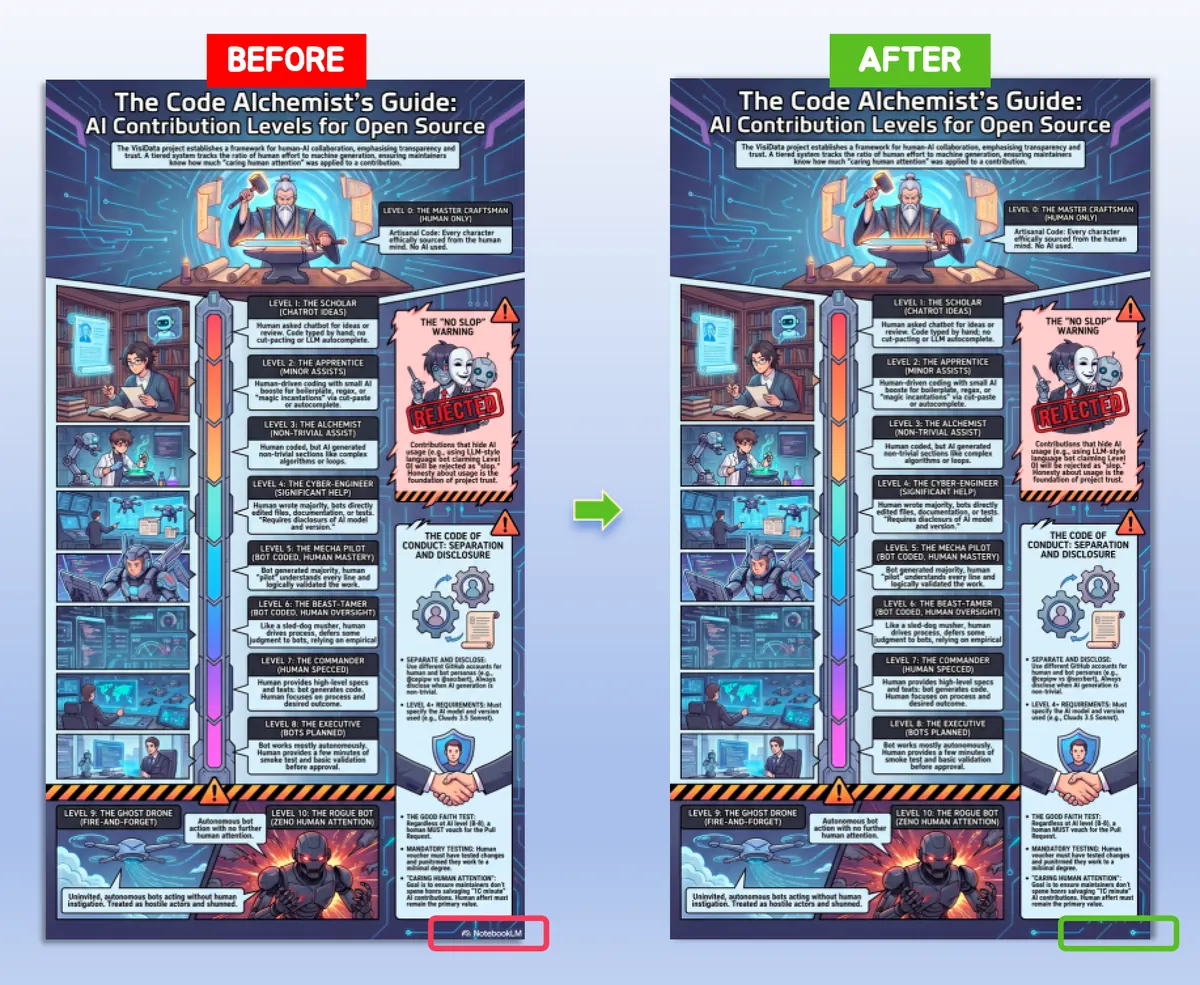
Figure 3: AI Smart cleanup focused on the lower-right NotebookLM watermark area
Step 3: Process and review the corner area
After removal, inspect three things:
- The transition above the repaired corner
- The right edge for visible banding or color mismatch
- Any fine patterns, shadows, or gradients near the original watermark area
On plain backgrounds, cleanup is usually straightforward. On charts, illustrations, and gradients, a quick zoom-in review is worth the extra few seconds. The goal is not just to remove NotebookLM watermark, but to keep the repaired corner believable.
If the repaired corner looks too flat, blurred, or broken, retry with the original higher-quality export. If the watermark overlaps critical text or a chart label, use the preview as a decision point rather than assuming the automatic result is ready.
Step 4: Save the clean image for the right use case
After the preview passes, download the cleaned file and check it in the place where it will be used. A repair that looks fine in the browser preview should still be checked inside the final deck, document, blog layout, or social thumbnail.
For slide decks, confirm that the image still aligns with the slide frame. For documentation, check whether captions or source labels near the corner remain legible. For blog images, preview the compressed version because image optimization can make subtle corner artifacts easier to notice.
Quality Rubric: What Counts as a Good Result?
A good NotebookLM watermark cleanup should pass four checks.
1. The canvas is unchanged
The cleaned image should keep the same width, height, and aspect ratio as the original export. If the dimensions change unexpectedly, the result may not fit your slide, document, or template.
2. The repaired corner matches nearby texture
The lower-right corner should not look like a flat square, blur patch, repeated clone texture, or abrupt color block. Compare it with the area just above and to the left of the repaired region.
3. Structured elements remain intact
NotebookLM visuals often include boxes, dividers, charts, arrows, or labels. A good cleanup should not break those elements. If a border or axis line is interrupted, the image may look edited even if the watermark is gone.
4. The final display size still looks natural
Inspect the image at the size where people will see it. Full-screen slide use requires a stricter result than a small blog thumbnail.
This rubric is the practical reason to use a dedicated guide instead of relying only on a one-click answer.
Best Workflow to Remove NotebookLM Watermark by Image Type
Solid backgrounds
AI Smart cleanup usually works well because the repair area is small and easy to blend back into the corner. Still check for a flat color block, especially if the original background has a subtle paper texture, shadow, or gradient.
Gradient backgrounds
AI Smart cleanup is the better fit here. Gradients make visible seams more likely, so you should review the repaired edge before downloading. Watch for abrupt color jumps along the bottom and right sides.
Dense illustrations or charts
Start with AI Smart cleanup, then review carefully. If the lower-right corner contains labels, legend items, axis marks, source citations, or structured diagrams, no automatic method will be perfect every time.
Presentation or document screenshots
If layout precision matters, keeping the original dimensions is usually the right call. That is where AI Smart cleanup is more useful than manual editing or crop-based removal.
Blog and social visuals
If the image will be viewed small, the repaired corner may not need pixel-perfect reconstruction. Check it at the size where the audience will actually see it. A corner that is acceptable in a blog thumbnail may still be too obvious in a full-screen slide.
Common Problems and How to Avoid Them
The corner looks smudged
This usually happens when the repair area is larger than necessary or the surrounding texture is too complex. Try again with the original export if you started from a compressed copy.
The repaired area looks too flat
Flat fills work well on simple backgrounds, but they are more obvious on photos, gradients, and textured illustrations. In those cases, zoom in on the repaired corner before downloading.
A chart border looks broken
This can happen when a watermark touches a table edge, border, connector line, or axis. If the line matters, compare the before and after carefully. A clean-looking blank corner is not enough if the chart structure is interrupted.
Small text becomes hard to read
NotebookLM visuals can include labels, source snippets, legends, or citations. If text near the watermark becomes soft or distorted, do not use the result in a professional document. Retry with a cleaner source export or leave the original visible mark if disclosure matters more than appearance.
The corner still looks busy after repair
If the lower-right corner contains legends, labels, or dense illustration details, use the repaired preview as a decision point rather than assuming every export should be handled the same way.
The result is usable but not perfect
That is normal on complex imagery. The goal is a natural-looking lower-right corner for real-world use in notes, decks, and documents, not a synthetic pixel-for-pixel reconstruction.
FAQ
What is the fastest way to remove a NotebookLM watermark?
The fastest reliable method is to run an AI Smart lower-right corner cleanup and review the repaired area once before downloading.
How do I keep the original image size after removing the NotebookLM watermark?
Use a smart reconstruction workflow that repairs the bottom-right corner instead of trimming it away. This is the better choice for presentations, thumbnails, and layouts that depend on exact dimensions.
Will NotebookLM watermark removal affect image quality?
The workflow keeps the original canvas and general quality settings, but the repaired corner should still be checked on detailed illustrations, charts, and gradients.
Can I remove NotebookLM watermark online for free?
Yes. A browser-based remover is enough for most single images and small batches, and it is easier than opening a desktop editor for a simple corner cleanup.
Is this guide about how to remove NotebookLM watermark or just what it means?
This page is the practical guide for how to remove NotebookLM watermark. If you only want the meaning of the shorter search phrase, read NotebookLM remove watermark.
Can I process multiple NotebookLM images at once?
Yes. You can upload multiple images in one session, process them together, and review each result before downloading.
Should I crop a NotebookLM watermark?
Usually no. Cropping can work if the corner is disposable, but most NotebookLM exports are reused in fixed layouts. AI Smart repair is a safer default when you need to preserve dimensions.
What should I check before downloading?
Check the lower-right edge, chart borders, labels, legends, gradients, and any fine lines near the repaired area.
Which NotebookLM Watermark Removal Approach Should You Choose?
In practice, most users only need one clear workflow:
1. Keep the original image shape
NotebookLM exports are usually reused in slides, notes, and reference documents, so keeping the original canvas is often the right default.
2. Focus on the lower-right corner
The watermark is small, fixed, and corner-based. That makes a targeted lower-right repair workflow more practical than broad object removal.
If you remove NotebookLM watermark with a broad object remover, it may patch more area than necessary. A focused corner workflow is usually easier to review.
3. Review the repaired corner before downloading
Always zoom in once before exporting the final image. On simple backgrounds, cleanup is usually straightforward. On charts, gradients, or dense illustrations, a quick review prevents obvious repair traces.
4. Retry with the original export if the preview looks weak
If the first result still looks soft or uneven, retry with a higher-quality source image. More surrounding pixel information usually improves the corner repair.
Final Recommendation
If you just need a clean NotebookLM image quickly, use an AI Smart lower-right corner cleanup and review the repaired corner once before exporting the final file. That is the shortest reliable answer to how to remove NotebookLM watermark while keeping the image usable.
That is the most practical answer to how to remove NotebookLM watermark without overcomplicating the workflow.
Remove NotebookLM Watermark Free Online